Localizing your application
In the last chapter, we explained how to integrate your device, this task will be an essential part of every real world project. This is where newbies are often struggling, so hopefully you could make your way until the very end of this long chapter! In order to provide universal, target independent instructions, we explained the integration with a web browser device which is universally available to all users. So what’s next? It’s very likely that with your application you are targeting customers worldwide. At this point you are inevitably confronted with the localization of your application. The earlier you get started, the better it is, avoiding cumbersome rework afterwards! Fortunately localization is deeply embedded into Chora language used by Embedded Wizard, this makes it really easy to get things done right here.
Multilingual applications: concepts
As already stated above, the concept of languages is deeply embedded into the Chora programming language. In fact, Chora has even a data type language that represents a language. Each project contains at least one ore more members of this type. Please note that there are two different kind of language members:
-
the member named Default, represented by the icon
 . Each project has this member, which represents the so called fallback language exactly once. This Default member can neither be renamed nor can it be removed from the project.
 -
user defined members, usually named after the language they represent, e.g.
 . For each language you support, you have to add a language member.
Language switching will be achieved by assigning a language member name to the built in global variable language. Don’t confuse the built in global variable language with the data type language, both are named identical!
Adding another language
If you want to make use of multiple languages inside our project, you have to have an associated language on the Projects tab for each language you would like to use. So let’s add German as second language to our project. Once done, we are able to switch between the default language (English in our case) and the German language:
-
Click on the
 Project tab (the first tab from the left).
 -
Identify the note frame with the caption Languages, it only contains the icon
representing the default language. -
From the gallery templates window to the left, drag the Language element
 inside the Chora folder over to the canvas and place it underneath the existing Default language. Rename the language to German. Resize the note frame and rearrange the elements on the canvas so that the layout looks nice again.
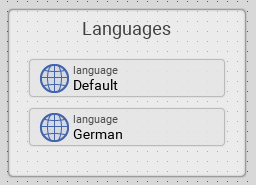
The Language section of your project should now look as shown in Figure 1 below:
|
Now that we have two languages defined, we can switch between these two languages using the Language dropdown list located in the second row of the toolbar, placed between the Profiles dropdown list and the Styles dropdown list: 
Figure 2. Dropdown list for switching between different languages
|
Adding language strings / constants
We just added a second language to our project, but this is not the end: next we have to add language strings to our project that will be used when we want to display text in different languages. We will put all these strings inside a new unit Strings so let’s go ahead and add the unit and the language strings:
-
Invoke the
Project tab by clicking on the icon  in the first row of the toolbar (Ctrl+Shift+P).
 -
Identify the note frame with the caption GUI project, it only contains the icon
 representing the Application unit.
 -
From the gallery templates window to the left, drag the element
 Unit inside the Chora folder over to the canvas and place it right to the existing Application unit. Rename the unit to Strings.
 -
Double click on the newly inserted unit
 . Inside the composer window, a new tab Strings appears which shows the currently empty unit.
 -
From the gallery templates window to the left, drag the element
 Annotation Group, over to root canvas. Rename the group to Application.
 -
From the gallery templates window to the left, drag the element
 Constant inside the Chora folder over to the canvas and place it inside the just inserted annotation group . Rename the constant to HeaderTutorialApplication.
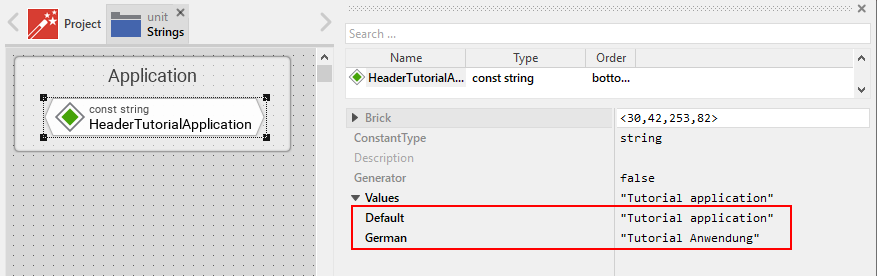
With the newly inserted language string selected, have a look at the inspector window and identify the element Values for the constant, which by default has the value "Hello World". Please note the small triangle at the left hand side of the _Values field. Click on the triangle and two more rows will come up: Default and German. While the Default row holds the fallback value for the string, the row German shall be used for the German translation string. Surely you grasped the concept already: the rows represent the language variant of the string constant, there is one row for each project language defined. If we defined a new language Spanish to the project, another row Spanish would appear. This concept of language variants makes localizing you application very easy. Let’s move on:
-
Since we want to use the newly inserted language string as header text of our application, we change the value Default from "Hello World" to "Tutorial application" and the value German to "Tutorial Anwendung". Don’t forget the surrounding double quotes in both cases or you may run in trouble.
-
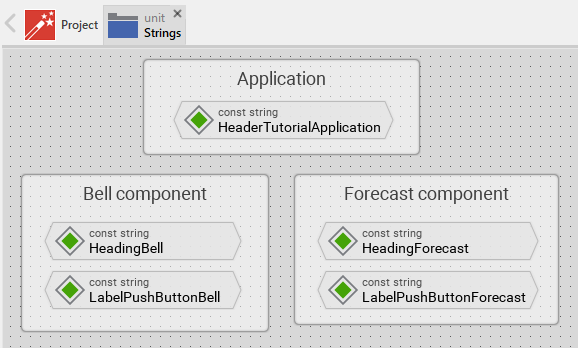
Add two new annotation groups with two new language strings inside each group. Consult Table 1 concerning the details.
| Name | Default / Fallback value | German translation | Annotation group |
|---|---|---|---|
HeadingBell |
"Bell" |
"Klingel" |
Bell component |
LabelPushButtonBell |
"Ring" |
"Läuten" |
|
HeadingForeCast |
"Weather report" |
"Wetterbericht" |
Forecast component |
LabelPushButtonForeCast |
"Show" |
"Aufrufen" |
Once all four language strings were added to the project, the Strings unit should look as illustrated in Table 1.
Localize the application text strings
Now that we have the language strings defined, let’s make use of them!
-
Open the TutorialApplication root class. To do so, invoke the Profile tab, double click on the icon
. In the Application unit, click double click on the icon  , representing the root application class.
 -
With the root canvas displayed, click on the header text element of your application. In the inspector window, have a look at the property String of this text element. Currently, this property has the hard-coded value "Tutorial application" assigned. Delete the hard-coded value and write in Strings::HeaderTutorialApplication instead: we now use one of the five localized language strings we added in the previous step. Instead of typing in the value manually, you may make select this value from the dropdown list that appears once you click on the triangle at the right end of the row.
-
Next, we have localize the bell component: inside the inspector window, search for and click on the BellComponent or click on the component in the main window. Change the property TextHeader of this component to the language string Strings::HeadingBell. Also, change the property LabelButton of this component to the language string Strings::LabelPushButtonBell.
-
Finally, we have localize the forecast component: inside the inspector window, search for and click on the ForecastComponent or click on the component in the main window. Change the property TextHeader of this component to the language string Strings::HeadingForecast. Also, change the property LabelButton of this component to the language string Strings::LabelPushButtonForecast.
That’s it, our application uses localized text strings now! Let’s test this out: use the language dropdown (illustrated in Figure 2) to change the project language to German and all the textual elements used in our application will change to German immediately! Isn’t that great? For sure, we will need a language switcher now, allowing the user to switch the language. Stay with us, in the next chapter, we will explain how to add such a switcher to the application!